One big reason people love mechanical keyboards is the clacky and thocky sounds their switches make. That sound is what sets them apart from regular membrane keyboards. But over time, those nice sounds can turn into something less pleasant like a pinging noise from the springs or a scratchy, plastic-like sound with every key press.
When that happens, it doesn’t mean your keyboard is ruined. It just means the switches need a little care. That’s where lubricating your switches comes in. Lubing is one of the most common and effective mods among mechanical keyboard enthusiasts. It makes your switches smoother, quieter, and more enjoyable to use.
In this guide, we’ll go step by step on how to lubricate your switches so you can bring back that satisfying typing sound and feel. It’s a simple fix that makes a big difference.
Essential Items to Lube Your Switches
First, you’ll need a few tools and supplies before you start lubing your switches.
- Switch opener – this makes it easy to open the switches without damaging them.
- Lubricant – Krytox 205g0 is highly recommended for linear switches, while Tribosys 3203 works great for tactile switches.
- Grease for springs – Krytox 105 is often used to reduce spring ping.
- Small paintbrush – to carefully apply the lube.
- Jeweler’s tool or tweezers – handy for handling small parts without losing them.
It’s best to set up a clean workspace with good lighting before you begin. Having all your tools ready will make the process smoother and prevent frustration. Some people even use a switch holder or tray to keep everything organized while working.
Steps for lubing your switches
1. Remove the switches from your keyboard
If you have a hot-swappable keyboard, this step is easy just use a switch puller to carefully pull the switch straight out. Make sure you don’t twist it too much, as that can bend the pins.
If your keyboard is not hot-swappable, you’ll need to desolder the switches. This requires a soldering iron, solder sucker, and some patience. It’s a more advanced process, so if you’re new to soldering, you may want to practice on a cheaper board first or get help from someone experienced.
Before moving forward, double-check that you’ve removed all the switches you plan to lube and keep them in a small container or tray, so you don’t lose any parts.
2. Take the switches apart
Now that your switches are removed, the next step is to open them up. If you look closely at a switch, you’ll notice small plastic tabs on the sides that lock the top housing and bottom housing together. These tabs are what hold the switch in place.
A switch opener makes this process much easier. Most switch openers have two interior grooves or slots, designed to match the tabs of different switch types (like Cherry-style or Kailh-style housings). Place the switch right side up on the opener, carefully aligning the tabs of the switch with the notches on the tool. Once it’s lined up, press down gently but firmly the housing will pop open, separating the top and bottom pieces.
If you don’t have a switch opener, you can still open switches with a thin flat tool (like tweezers or a small flathead screwdriver), but it takes more time, and you risk damaging the plastic. That’s why using a proper switch opener is recommended.
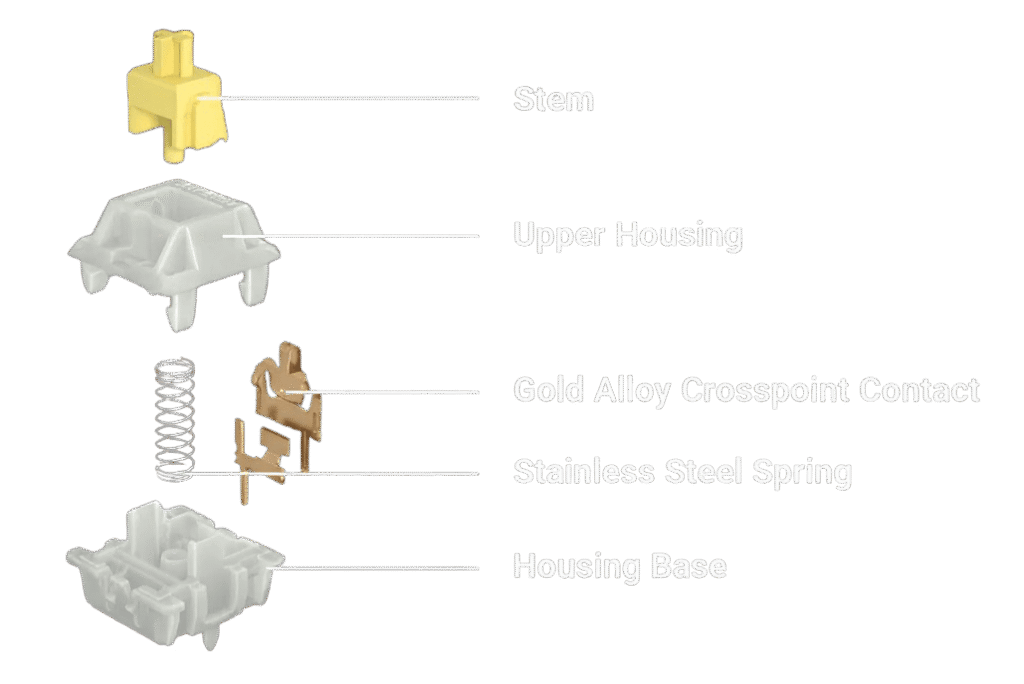
When the switch is open, you’ll see four main parts inside:
- Top housing
- Bottom housing
- Stem (the moving part that touches the keycap)
- Spring
Keep these parts organized in small containers or sections of a tray. Losing even one spring or stem can slow you down.
3. Lube the springs.
Start by lubricating the springs, since this step is a little different from the rest of the switch parts. Springs are responsible for the resistance you feel when pressing a key, but they can also be a big source of unwanted noise like a metallic ping. Properly lubing them reduces that sound and makes each keystroke feel smoother.
The most common method is called bag lubing. Here’s how to do it:
- Place all your springs into a small sealable bag or container (something like a zip-lock bag works well).
- Add a small amount of thin, oil-based lubricant Krytox 105 is a popular choice.
- Seal the bag tightly, then shake it vigorously for a few minutes. The movement ensures each spring gets an even coat of lube.
After shaking, carefully take the springs out and let any excess oil settle. You don’t want them dripping with lube just lightly coated.
This technique is both fast and effective, especially if you’re working with dozens of switches. Compared to brushing each spring individually, bag lubing saves a lot of time while still giving you consistent results.
Tip: Don’t go overboard with the oil. A little goes a long way, and using too much can make the springs feel sluggish instead of smooth.
4. Lubing the bottom housing
After you’ve finished lubing the springs, it’s time to move on to the rest of the switch. The bottom housing is the part where the stem and spring sit, and it plays a big role in how smooth your keystrokes feel.
To lube it properly:
- Take a small paintbrush and dip it lightly into your lubricant (Krytox 205g0 is often used for linear switches, while a lighter lube like Tribosys 3203 works better for tactile ones).
- Apply a thin, even coat to the inner rails of the bottom housing—these are the tiny tracks where the stem slides up and down.
- Make sure not to overload the brush. Too much lube can make the switch feel sluggish or “mushy.”
- You can also lightly coat the area where the spring rests, as this helps cut down on spring noise.
Think of this step like greasing a sliding door track. A little smoothness here goes a long way, and it sets the foundation for the rest of the lubing process.
Tip: Always work carefully and keep the lube controlled. It’s much easier to add a little more later than to fix an over-lubed switch.
5. Lubing the stem and top housing
Once the bottom housing is done, set it aside. Now focus on the stem first, then move on to the top housing.
Start with the stem:
- Take your small brush and dip it lightly in the lube.
- Gently apply a thin, even coat to the flat sides of the stem—the parts that make contact with the rails in the housing. This is what helps the stem slide smoothly up and down.
- Avoid getting lube on the stem legs if you’re working with tactile switches, since that can reduce the tactile bump. For linear switches, it’s fine to lube the legs.
Next, the top housing:
- Use a fine-tipped brush to apply a very thin layer of lube on the inside surfaces where the stem will touch.
- Pay attention to the small rails inside the top housing and the surfaces around the slider carrier. A light coat here reduces friction and keeps the switch feeling consistent.
6. Reassemble and enjoy
Now put the switches back into your keyboard. If you have a hot-swap board, just push them back into the sockets until they click into place. If your board is soldered, you’ll need to carefully solder each switch back onto the PCB.
Once everything is back together, you’ll notice the difference right away. Your switches will feel smoother, and the sound will be more refined whether that’s a deeper thock or a softer clack, depending on your setup.
Take a moment to enjoy typing on your newly lubed switches. It’s one of the simplest mods that can completely change the personality of your keyboard.
Want to add a personal touch from the ground up? Check out our guide on How to make custom keycaps and finish your setup in style.
")


